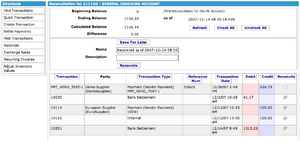
Reconcile Account Screen
This screen allows you to reconcile the transactions and the final balance of a GL account versus physical records or statements you may have received. The process of reconciling an account is that you check off the transactions which match your physical records until the balance calculated from the initial balance and your checked off transactions match your desired ending balance. Then you can mark the account "reconciled."
It displays the following information:
- Beginning Balance - This is the balance as of the account's last reconciliation.
- Ending Balance - This is the ending balance you entered on the Select Account to Reconcile Screen.
- Calculated Balance - This is the balance calculated from the initial balance and all of the transactions you have checked off.
- Difference - This is the difference between the ending balance you entered and the calculated balance. Once this is zero, you can click on the [Reconcile] button below.
- Name - This is the name of the reconciliation. By default, it is just "Reconciled as of " the current date and time.
- Description - This field allows you to enter descriptive or notes about this reconciliation.
Below is a list of the transactions of the GL account which have not been reconciled yet, showing:
- Transaction - This is the internal ID of the transaction. You can click on it to view details of the transaction.
- Party - This is the customer or vendor or other party related to this transaction.
- Transaction Type - This is the type of the transaction: Payment, Settlement, Internal, etc.
- Reference Num - This is the reference number of the payment or invoice of this transaction. This is useful if you are reconciling against checks or invoices from other parties.
- Transaction Date - This is the date of the transaction.
- Debit and Credit - This is the debit or credit amount.
- Reconcile - Check this box, and this transaction will be marked tentatively reconciled, and its balance will be considered in the calculated balance.
Click on one of the heading columns to sort the list of transactions by that column's value.
The buttons on the screen are:
- [Refresh] - Clicking this button will update the list of transactions, in case there have been new ones.
- [Check All] and [Uncheck All] - These buttons will check and un-check all the transactions and recalculate the calculated balance.
- [Save For Later] - Clicking this button will save the tentatively marked transactions for later and exit this screen. When you come back to it again, the transactions you have checked will be checked, and you can continue where you left off.
- [Reconcile] - This button only becomes active if the difference between the calculated and the ending balance is now zero. Click on this button, and the system will mark all the checked off transactions as reconciled and record the balance of the reconciliation. You can then view this reconciliation later in the Reconciliation Detail Screen.
IMPORTANT NOTE - This screen is designed for the Mozilla and Firefox browsers and may not function properly in other browsers.
